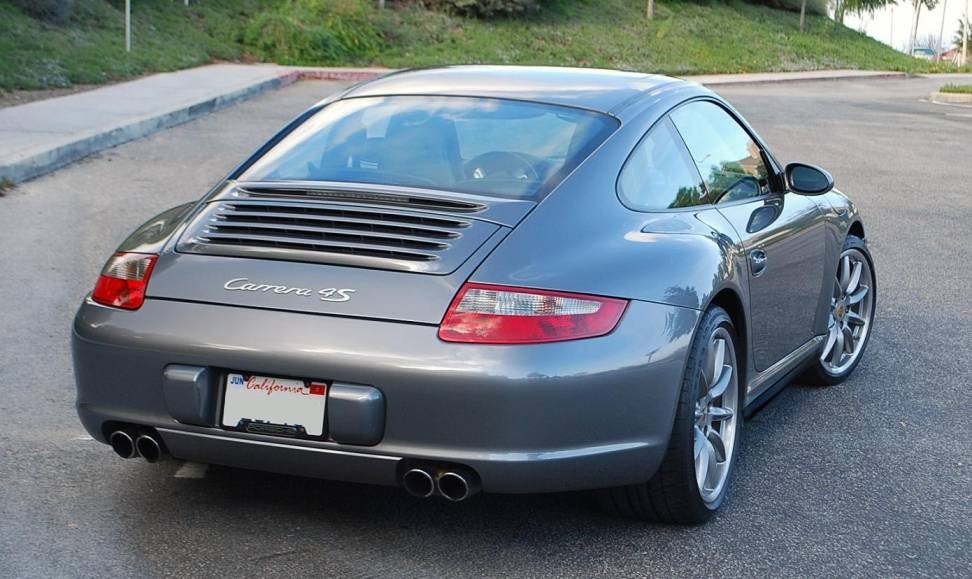
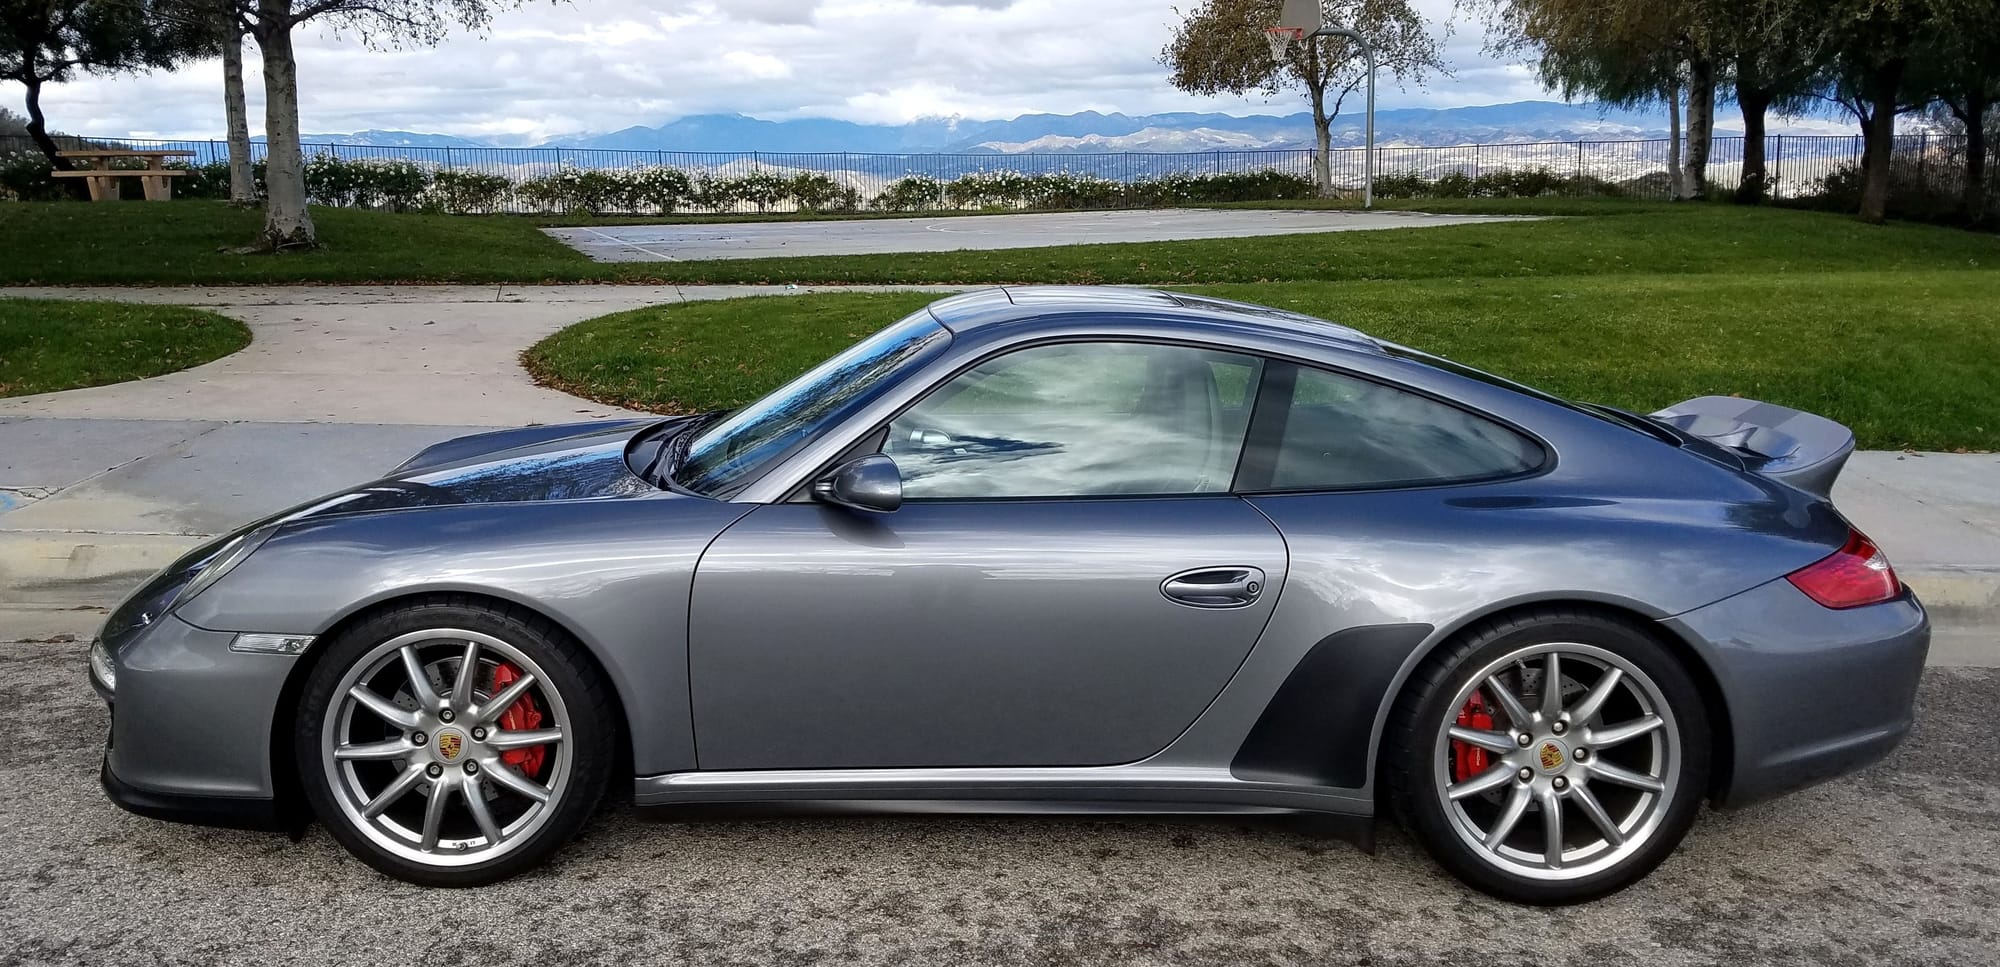
997 CARRERA 4S
2006 Carrera 4S
My name is Bill Diaz and just want to say thanks for visiting my website and page dedicated to my Porsche 911 Carrera 4S. Be sure to check out my other Porsche projects in the links to the left.
See my Carrera 4S reviewed with Matt Farah and I on The Smoking Tire youtube channel!
https://www.youtube.com/watch?v=4x-UzNCwk2g
My friend Matt Steele and I have talked about doing a film project about my Porsche Carrera 4S. Matt then took it upon himself to put together this project and try to capture the sights, sounds and excitement of a morning drive in the Porsche 911. Matt did it all with some additional camera help from our friend Chance Glasco. I was just the driver... I think I had the funnest job ;^) This is the first in a series of films Matt wants to make. He did an awesome job! Enjoy the short film and pass it along to all your car guy friends !
please share with all your car buddies ;^)
http://www.youtube.com/watch?
In Addition to the canyon project film above here are some more sights and sounds of a Spirited drive in the 997 Carrera 4S
https://www.youtube.com/watch?edit=vd&v=NTYq0FkCkNg
WheelWell.com https://wheelwell.com/bill-diaz
911 Carrera 4S Story:
It was a dream of mine and goal to some day own a Porsche 911. Although my first Porsche was the Boxster it was the 997 version of the 911 that really got me excited about adding a 911 to the garage. Next to the 993 911 I believe the 997 is the best looking 911 yet. A combination of great exterior and interior design that pay great homage to earlier 911's.
Because I did a lot of searching and was very specific about what options I wanted it took me about 6 months of daily searching to finally find the awesome car. I feel like there was very little I ever wanted to change about her for quite awhile. Unlike my Boxster, which has undergone major changes both exterior, engine, and interior,... I did not ever want to go that route with my 911.... or so I thought. See my Journey so far with my Carrera 4s below.
Original Options: 2006 Carrera C4S Seal Grey Metallic 6B4
-All Wheel Drive
-6 speed manual transmission
-Only 6,500 miles when purchased March 2010
-cpo warranty
-Navi Porsche Communication Mgmt
-Sun roof
-Sport Chrono Package Plus
-Sport Short Shifter
-Bose Audio with 6 disc changer
-Heated Silver Back Sport seats
-leather wrapped sport steering wheel
-Seal Grey Center Console
-Carbon Fiber Pkg shifter, brake lever, and dash trim
-Carrera sport wheels 8.5 front with 5mm spacers, 11.5 rear with17mm spacers
-Michellin Pilots 235/35/19 front 305/30/19 rear
-TPMS tire pressure monitoring system
-Colored crest caps
*** Update 2018
*** Update 2017
Racing at Streets of Willow Springs Photos
For some more great photos of my Carrera 4S go here:
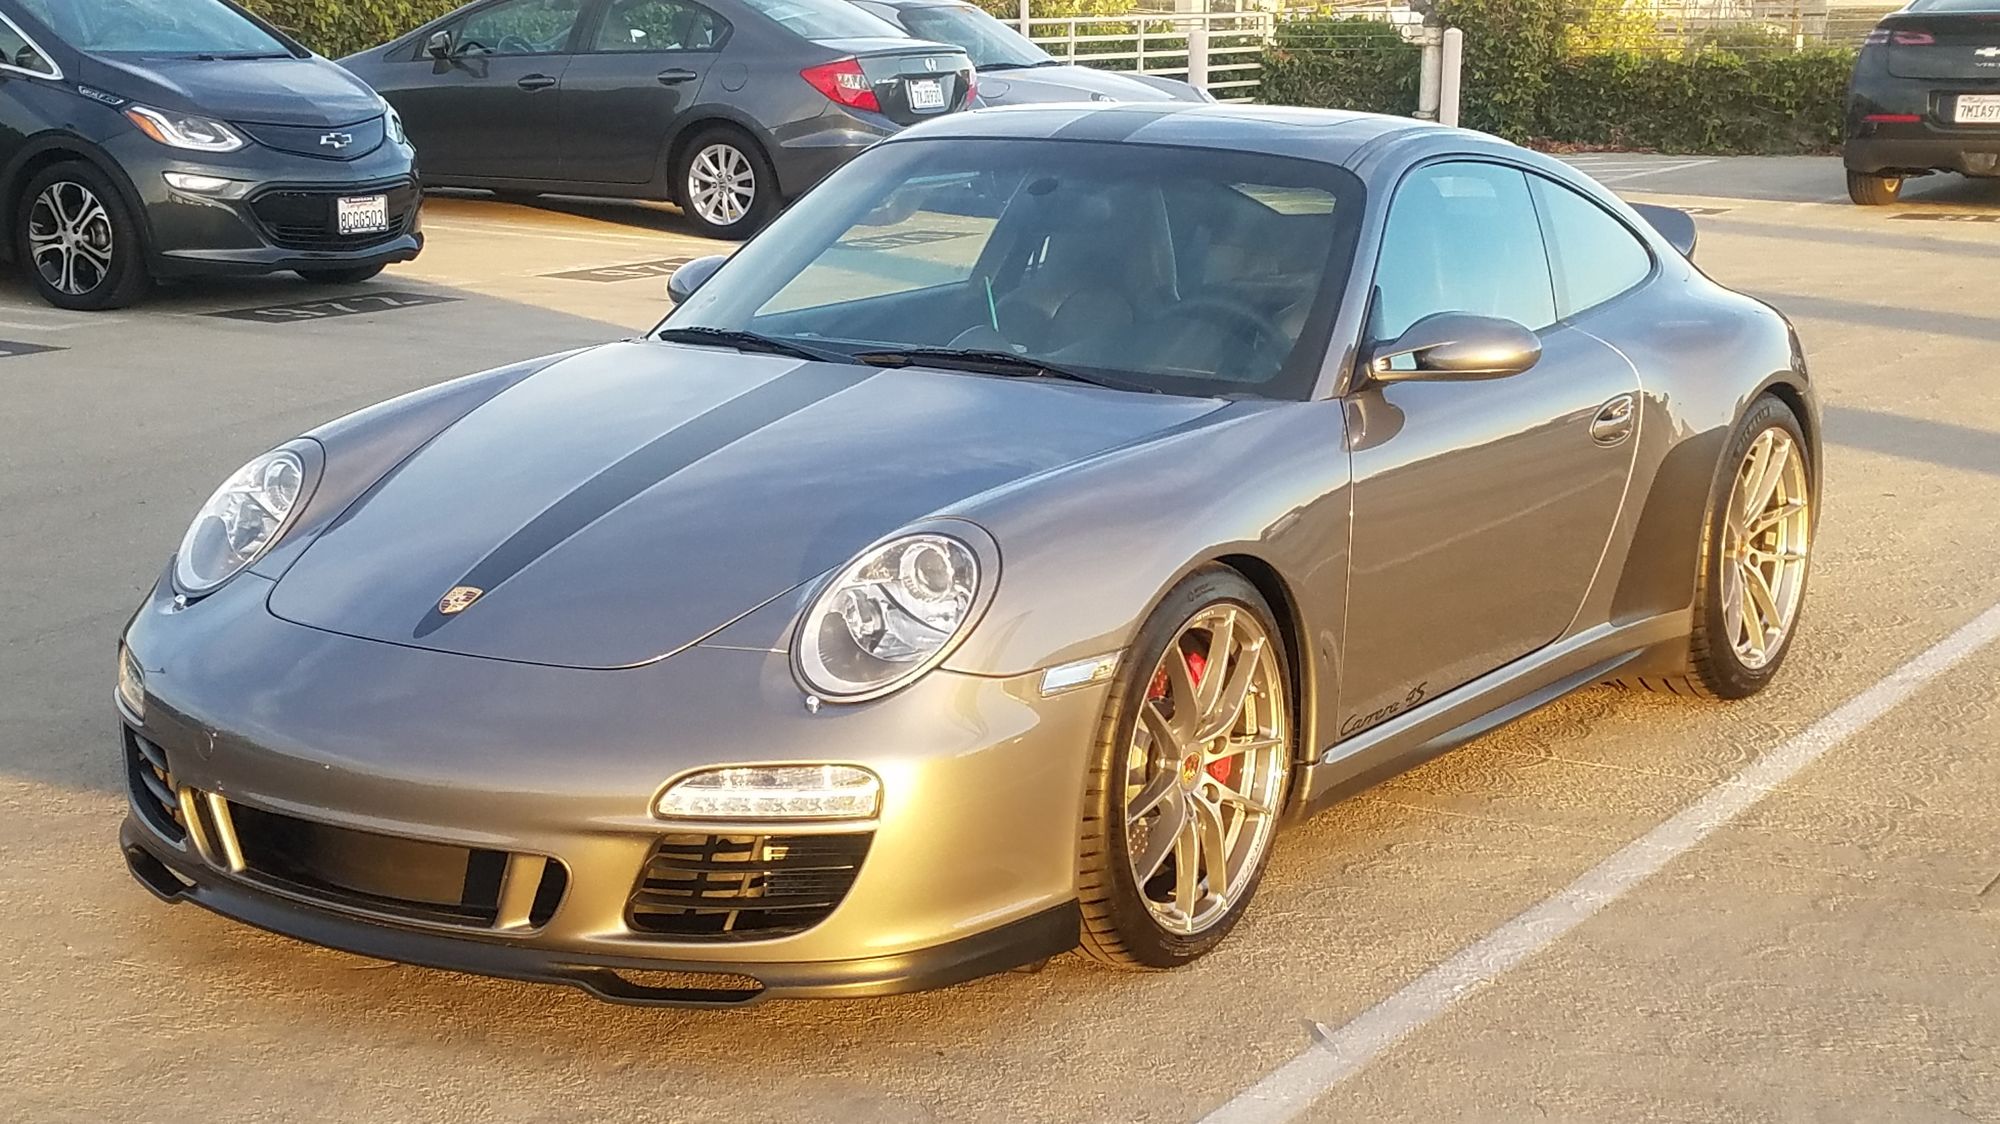
Below... From 2006 Stock to a 2010 Sport Classic Look!

Photo above is with no modifications.. Photo Below is modified with Carrera GTS bumper, side skirts and Duck Tail Spoiler
Photos Below show "Sport Classic" front bumper, chin spoiler, Getty Design Sport Classic Ducktail, GT2 sideskirts with Updated Rear 997.2 Conversion LED Lights, OZ Leggera HLT Wheels
Additonal Photos Go here:
OZ Wheels photo page:
http://www.qikqbnboxster.mysite.com/photo_5.html
Canyons and track photo page:
http://www.qikqbnboxster.mysite.com/photo_4.html
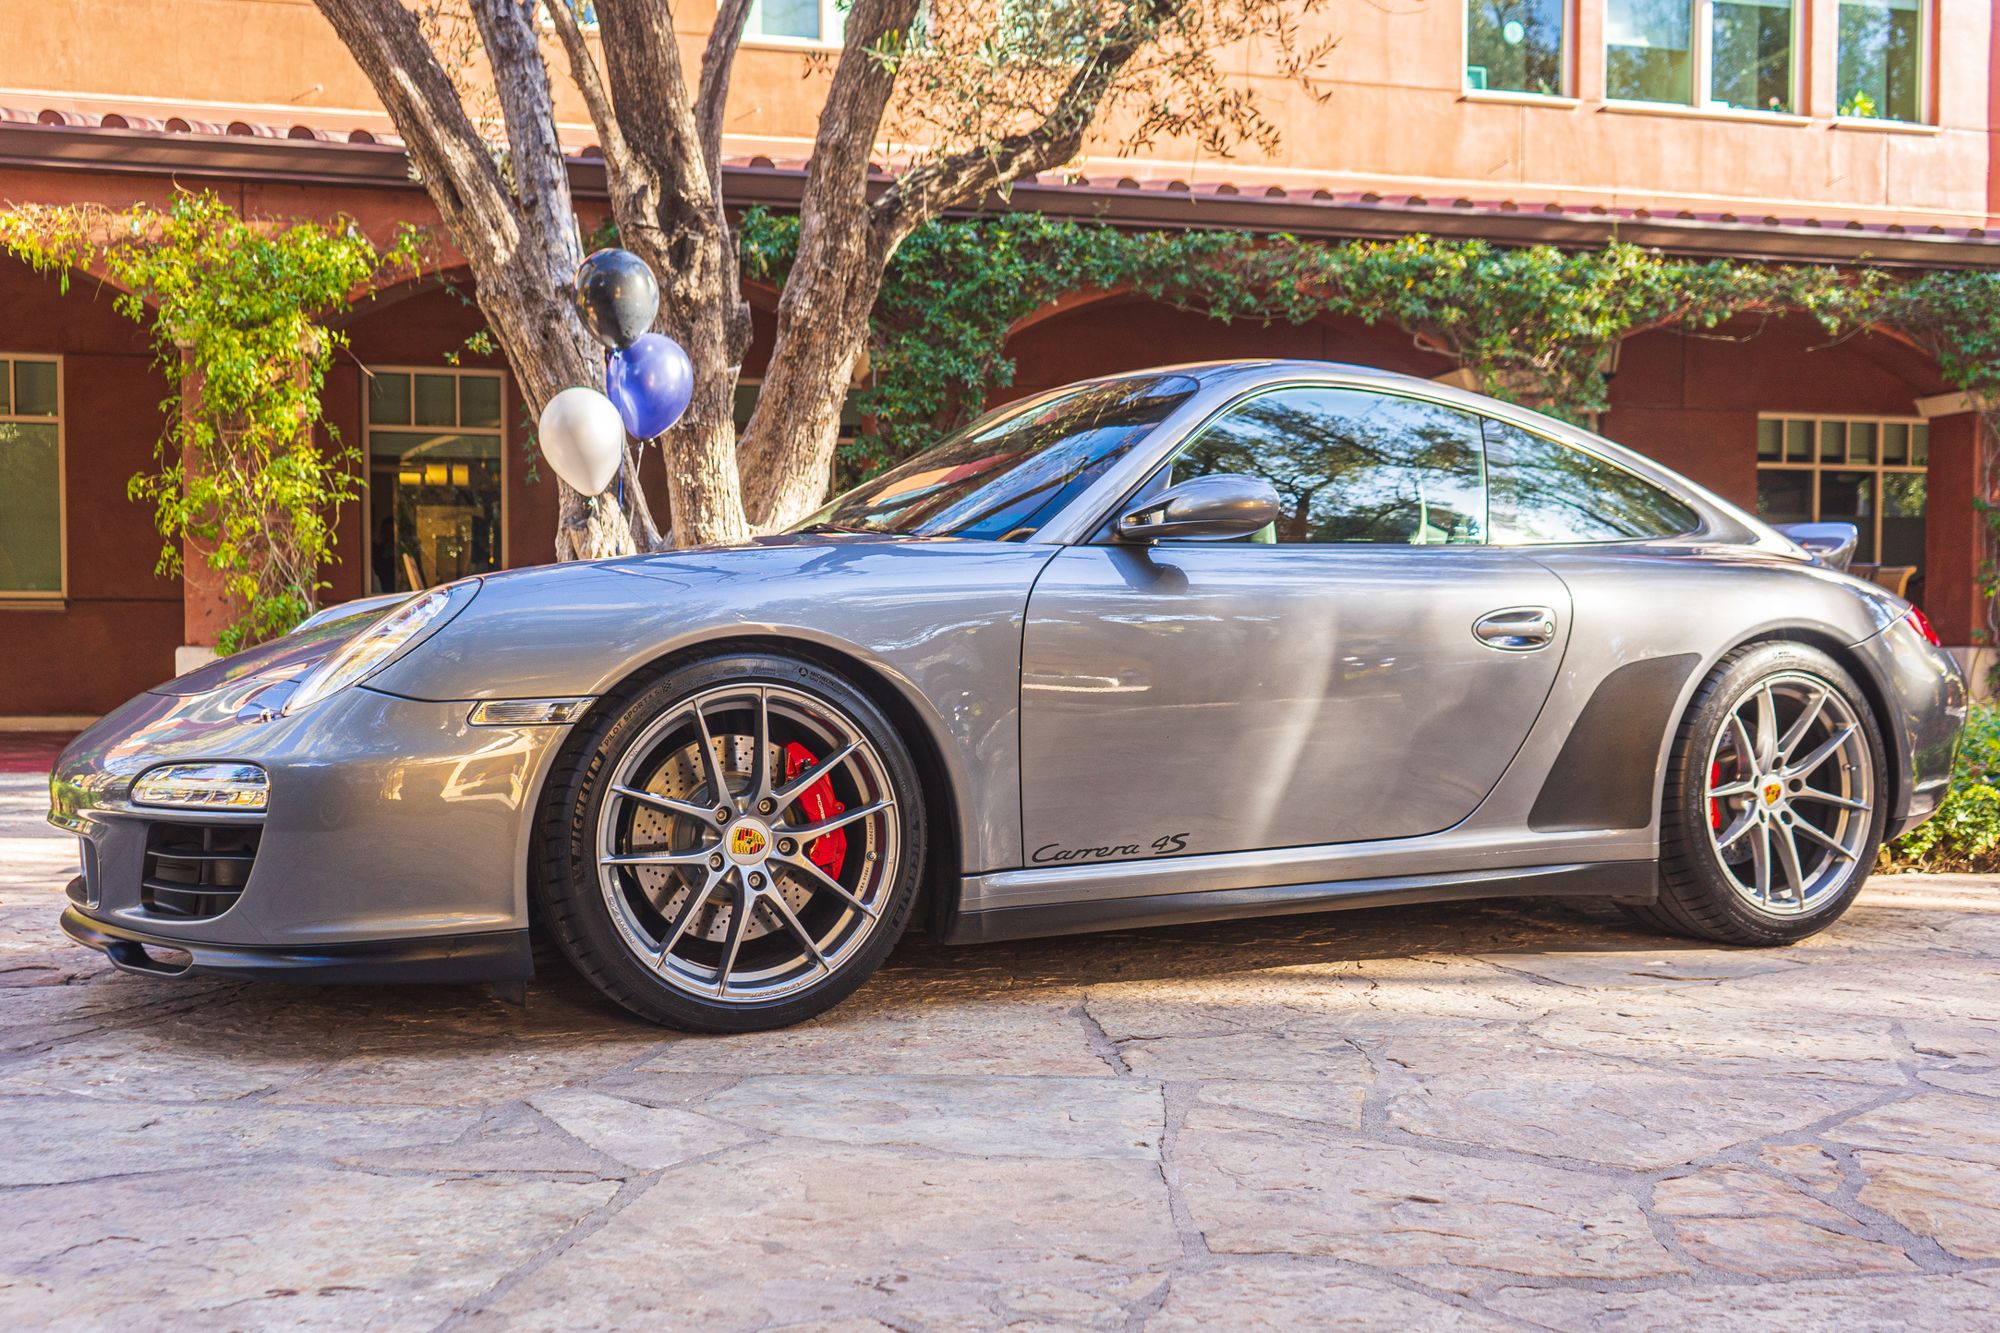
***MODIFICATIONS:
**BODY
-Porsche Sport Classic Front Bumper and Lip Spoiler
-Front Bumper LED light conversion to 997.2 Specs
-Getty Design Ducktail
-GT2RS Side skirts / Rocker Panels
-997.2 Rear Bumper Conversion
-Rear LED Tail lights conversion to 997.2 Specs
-Renndecals Racing Stripes and side script
**ENGINE
-SOFTRONIC 997 ECU Upgrade. +25 HP
-EVOMS V-FLow Cold Air Intake Kit **Current Use
-K&N Cold Air Intake Kit 57-7000** Previous Use
-IPD Competition Plenum 82mm
-GT3 Throttle Body 82mm
-Porsche Sport Exhaust Conversion with Valves.
-Engine Performance 390 Horsepower 310 Torque
**WHEELS / SUSPENSION
-OZ Leggera HLT 19x8.5 front 19x12 rear
-Michelin Pilot Sport 4S 245/35/19 front 325/30/19 rear
-EIBACH PRO-KIT lowering springs 30mm drop = 1.2 inch drop
-EIBACH 25mm Adjustable Rear Sway Bar. (GT3 Spec)
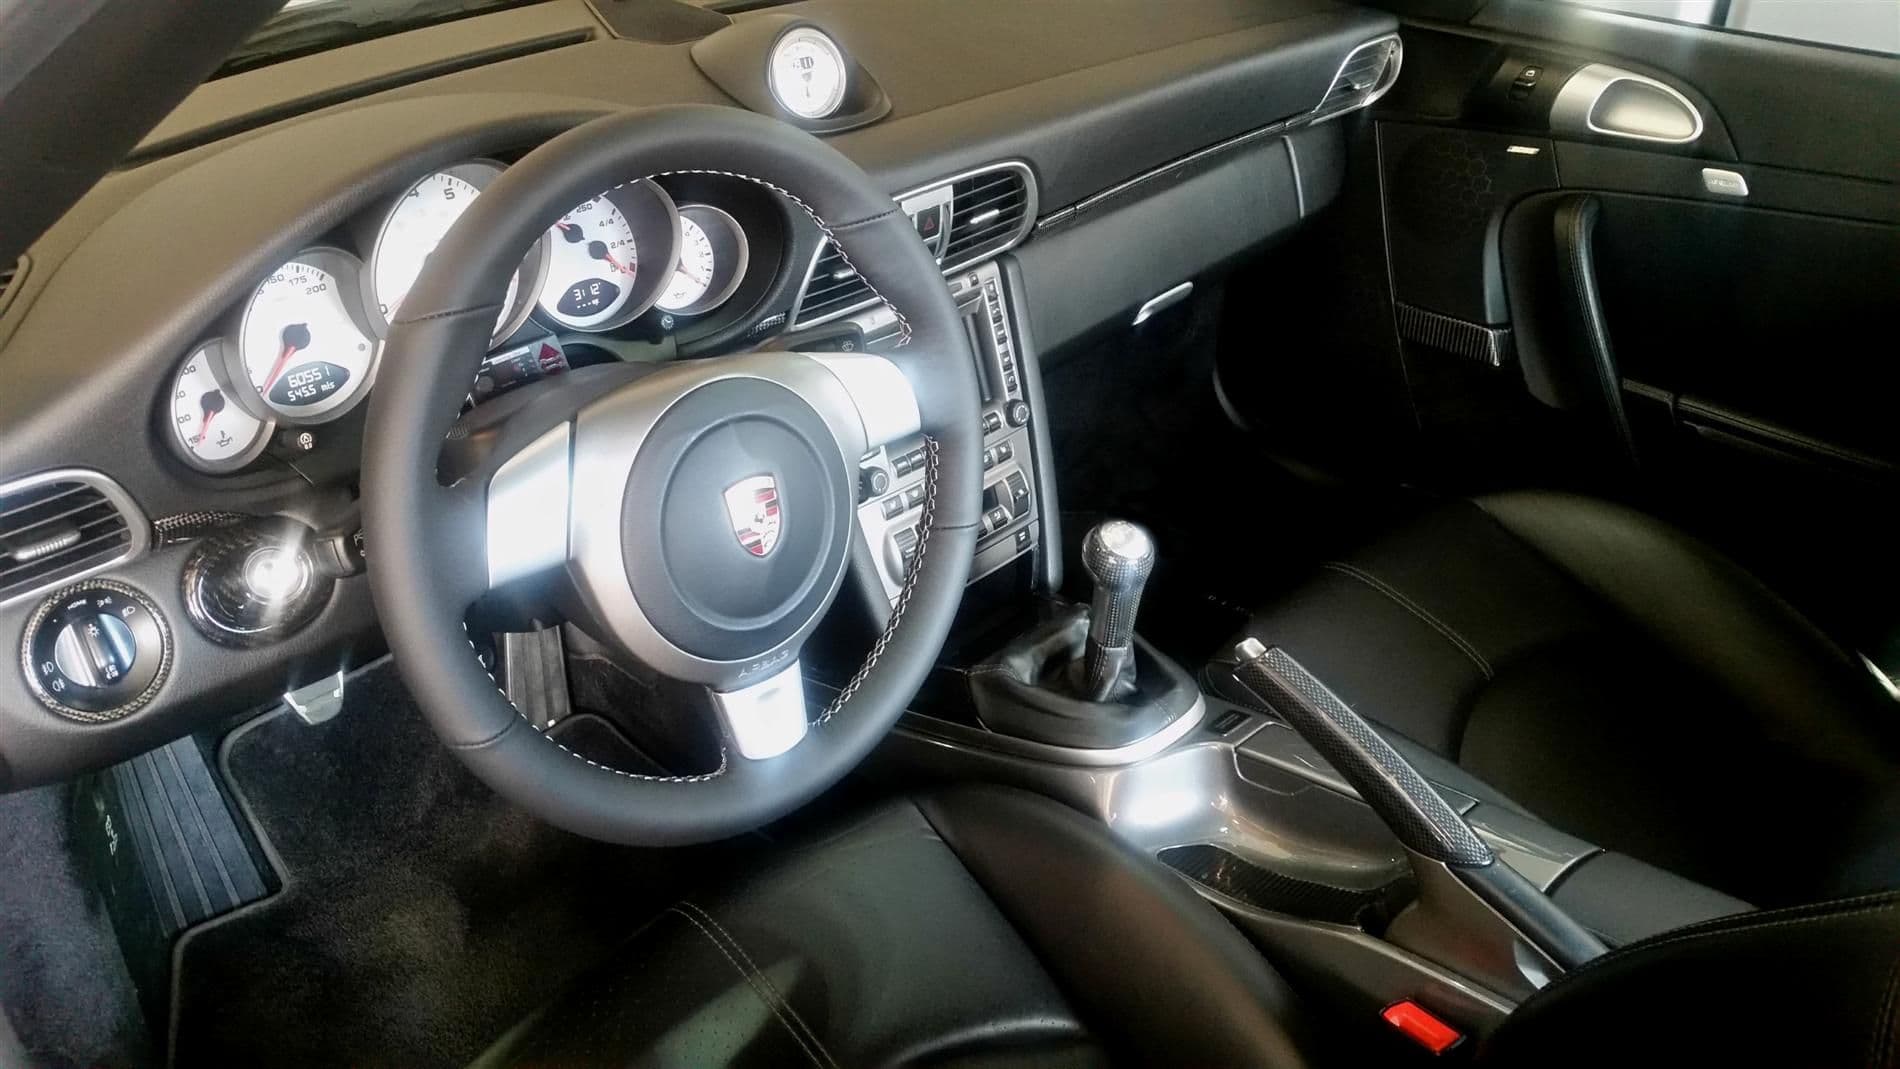
**INTERIOR
-Porsche Short Shift Kit 997-424-983-00
-Dallas Custom Steering Wheel 1/16 Napa Black Leather wrap upgrade
-Mr12Volt LA Power Bluetooth PCM upgrade.
***UPDATES 2020
So I have been interested in ECU Tuning for my cars for quite a while. I did several dyno tuning sessions on my Boxster 3.4 project when I did the engine conversion many years ago. I know the benefits of a proper tuning and adjusting air fuel ratios from rich to lean. I have an air fuel ratio gauge in my Boxster and also have a hand held computer/ MAF air signal controller I can adjust air fuel ratios from the drivers seat. I have usually been on the optimistic side of bolt-ons and tuning, but like most of us, am always a bit skeptical. My first concern with any modification is that no harm is done, but that only an improvement is made, even if it seems small.
First off, Thank you Scott at Softronic for taking the time to answer all my questions and even have a lengthy phone conversation about maf housing diameters, plenums, exhausts, and air fuel ratios. I learned a lot from our discussions. So Scott is VERY knowledgeable about all things "Porsche tuning". This put my mind at ease and discussing specifics about how the Softronic tune works also helped me feel more at ease and that no harm would be done and performance would improve.So here are my thoughts after driving the cars with the new ecu tune. I must admit that in CA we only have 91 Octane fuel. Scott recommended adding 104+ Octane booster for some added benefit, but not totally necessary. I added the 104+ Octane Booster to a full tank of fuel on both cars. So a 20 HP power increase is what is advertised for the Cayman S and a 24 HP increase is advertised for the Carrera 4S. These are basically about 7% increases in power. These are not night and day power increases for vehicles already running 300+ HP. (For night and day power increases you would need 50-60 HP) With that said, it is recommended to put about 30-50 miles on the car for the the ecu to rewrite some fuel maps because the previous memory was erased. I went through several scenarios of highway driving and also full throttle pulls to redline through each gear. I did this in each car several times over a few days.
Over all.... I am impressed. No harm was done and performance has increased. The power at first feels subtle, but as you put the miles on and the ecu adjusts you start to find yourself in familiar situations on the road, but this time the car feels like it pulls much stronger. It's not an OMG difference, but more of a smile and a nod and "Hey, that feels pretty good and definitely pulls harder to redline". The more miles I put on the more I feel it's making the right adjustments and the more I want to run to redline to feel the difference. It's hard to really know what a 7% difference will feel like, but I can say that the difference is noticeable. The cars just feel like they are running stronger and more eager to pull through the mid range than before, but the biggest difference felt is from 4500-7000 rpm. It just feels like it is pulling with more urgency. There is also less of a "flat spot to power surge" feel when the car comes on cam at 5000 rpm. The car feels like it's making more power before the cams hit so there is less of that flat spot on/off power surge.
You have to remember our naturally aspirated power curves take time to build and our cars make the most power above 5000 rpm. That is when the ecu tune makes the biggest difference too. It starts to improve around 3000 rpm, but really makes the most difference from 4000-7000 rpm.
Would I do this again? ... Yes... I think I would. I am happy with the modest increase in power and extra pull to redline. I like to tinker with safe/conservative mods. I feel Softronic has a good and safe product and it made a nice difference. After having my cars for many years and wanting a little more excitement, I think this did the job. I was always excited to drive my cars, but now I feel a bit more excited to explore the new power differences.
***UPDATE 4/2018
Got some new shoes! Been looking at the OZ Leggera HLT "Bright Race Grey" wheels for quite a while. Every couple years I get the urge to update the look of my car and wheels play a big role in a car's stance and how a car looks.
I had the OEM Carrera Sport Wheels, but finally decided to pull the trigger on these OZ Leggera HLT wheels and new set of Michelin Pilot Sport 4S tires. I went with the GT2 RS wheel/tire size setup. I am very happy with how it turned out!
Front: 19x8.5 et 53 OZ wheel with 245/35/19 Michelin Pilot Sport 4S
Rear: 19x12 et 51 OZ wheel with 325/30/19 Michelin Pilot Sport 4S
Tequipment Porsche Carrera Sport wheel Center Caps in GT Silver set of 4: 997-044-600-10
That part# has been replaced by a new design center cap that is still "GT Silver" , but with part # 000-044-605-30
Either part# will work nicely with the OZ "Bright Race Grey" color.
A set of 4 is not cheap. About $180-$200 and although I mentioned almost a perfect color match, it's very close, but don't get upset with me if you get them and it's off by a shade or so ;^).
It's not actually a perfect identical color code match, but I am meticulous and very detail oriented and I actually think they look great and oem. Metallic colors change depending on the angle of light and in some cases it looks darn near identical and in others just a shade light, but overall I am very happy with them.
***UPDATE 7/2017 997.2 Rear end conversion with LED lights. So over the last 4 or 5 years I have enjoyed the "Dectane" rear LED lights. They are basically original 997.1 rear light replacements, but they look similar in LED design to the 997.2 but retain the shape of the original. So it is plug and play. After I did my 997.2 front end conversion back in 2011 I always had in my mind to eventually do the rear conversion as well, but it was not a big priority so I kept putting it off. Recently a nice Porsche friend on the forums finally encouraged me some more to go through with it. So I bit the bullet and finally got it done. It does add a really nice updated look to the car and I am very happy with it. Here is a list of parts you will need.
1. Rear Bumper Cover for 997.2. I found mine on Ebay and I got the latest WideBody Bumper made for C4 models and mimics the GTS rear bumper with lower stone guard protectors.
2. Control Module -Part Number: 997-618-260-08 This module is under the driver seat. The original needs to be read by a durametric to write down what options are turned on. Then the updated module is installed and the old codes are input to the new module. The exception is Activating "LED" rear lights.
3. L+R Small Bumperettes for 997.2 rear bumper
Part # 997-505-625-05 + 997-505-626-05
3. L+R Exhaust tip heat shrouds for 997.2 rear bumper
Part # 997-505-651-01-01-C + 997-505-652-01-01-C.
4. 997.2 LED Rear Tail lights
5. 997-505-628-00-01C Side lower Cover, RIGHT 997-505-627-00-01C Side lower Cover, LEFT
When installing the new bumper there is a small off center tab that runs underneath the top middle lip that screws in close to where you airbox is. this little tab needs to be shaved/cut away. Also remove the lower center metal support bar off old bumper and apply to new one. Takes a bit of tugging and pulling, but it slips on . the lower support bars just behind the rear tires that attach to bumper are sometimes easier to remove from car and attach to bumper, then attach to car. hope that makes sense. If you shop around on ebay for most of the parts you are probably looking in the ball park of $2 grand all painted and installed.
***Update 5/2015
Decided to try out a larger set of 325/30/19 Michelin Super Sports on the rears. The original 305/30/19's were great, but always looked a little stretched on the 11.5 wide Carrera Sport wheels and didn't quite fill the arches in the way I really wanted. So today I decided to try 325/30/19's Michelin Super Sports. I also added larger front tires a few months ago and installed 245/35/19s Michelin Super Sports.
Porsche Carrera Sport Wheels Specs are:
19x8.5 front 55 offset and I am using a 5mm spacers as well. Couple months ago I needed new fronts and decided to go with a little bit larger tire. Wanting a bit more grip from the front end, especially for track days I decided to go with 245/35/19 Michelin Super Sports. The slightly larger size squares off the tire side wall compared to the original 235/30/19s.
19x11.5 rears with 50 offset and 17mm spacers from factory. As I mentioned the original 305/30/19's are a great tire, but always looked a little stretched on the 11.5 inch wide Carrera Sport wheels. The 305s didn't quite fill the arches the way I really wanted. Just needed a little more width in the tread to square up the side walls and fill in the wheel well arches.
I decided to try 325/30/19's Michelin Super Sports that are still within spec for awd turbo/4S front/rear ratios when used in combination with 245 fronts. Lots of Turbo guys are using this combo with great results and no issues with psm, traction control, or drive train.
The front to rear tire size ratios look like this and should work fine with the all wheel drive systems, traction control, and psm:
Original sizes: Michelin Super Sports Front 235/35/19 Diameter 25.5 inches Rear 305/30/19 Diameter 26.3 inches. Difference in diameter 8/10 inch.
Larger tires: Michelin Super Sports Front 245/35/19 Diameter 25.8 Inches Rear 325/30/19 Diameter 26.7 inches Difference in diameter 9/10 inch.
I have put about 100 miles on them and they feel great. Have yet to take it to the canyons or track to compare with 305's, but I am fairly confident they will perform great. I am happy with how they look and they fill out the wheel wells much better, and I will take it for a canyon blast this weekend 
***Update 2/2015
On this track day my front tires were already shot and down to 2/32 and hitting the wear bars. By lap 7 or 8 my front end grip was really struggling, I was under steering every where and it was causing my PSM stability control to kick in and kill my power. My front tires took their last breaths of life at the track, which is a good way to go out, and I got new front tires the very next day. I switched to 245/35/19's on the front and I have 305/30/19s on the rear. the 245/35/19 is 25.8" diameter compared to 235/35/19 diameter of 25.5". The rear tire 305/30/19 Diameter is 26.3 so by going to 245's I am still within the safety ratio of front to rear diameters for the all wheel drive system. The GT3's wear the 245 size too, so you gotta figure there is a slight advantage. It adds a touch more width and height which look really good to me. Overall driving quality and dynamics remains the same with a little more confidence and bite in the corners.
***Update 10/2014 DUCKTAIL by Getty Design
I have decided to keep this wonderful 911 Carrera 4S for a while. One thing I seemed to be experimenting with over the years was the rear ducktail. At first I wanted something more on the subtle side and the Misha ducktail was perfect for that. I finally decided, since I am keeping this car for a while longer, that I should do it right and make it look as close to the OEM Sport Classic duck tail. Getty Design makes a great duck tail that looks very similar to the OEM Sport Classic. I spoke with Mark and Arnold at Getty Design and they were extremely helpful in answering all my questions about the production process, materials and paint advice. I am very happy with the final result and feel this was the final piece to make my car look very similar to the the Porsche Sport Classic.
There are 2 types of wiring Harnesses. So be careful what you order. To Help clarify:
If you have a fixed wing without a 3rd brake light you need: 997-612-670-71
If you have a Fixed wing WITH a 3rd brake light you need: 997 622 670 70.
The DuckTail is considered a Fixed wing WITH 3rd brake light and requires Harness 997 622 670 70.
***Update 3/2014
Recently updated my old Misha Duck tail with the newer more raked/steeper angle Misha version. Love this steeper raked duck tail look much better. Also a fitment note/tip for every one who has a Misha duck tail.. Since the Misha tail fits "on top" of decklid it can look a bit high and not flush with the transition from the 3rd brake light to the deck lid. I removed the 4 screws that hold the decklid to its brackets, remove the decklid (remove fan 1st) Then make the bracket holes larger where the screws go in to give you more wiggle and adjustment room ( I used a round file to make the holes bigger) ... I had to widen the holes in the direction of the back of the car and down a few milimeters. With proper adjustment you can have the duck tail with a nice, flush and smooth transition.. It will look like a factory fitment and not after market.. I am really happy with the look of this tail with proper fitment.
3.8 Liter Engine EVOMS V-FLOW Intake Kit, IPD 82mm Competition Plenum, GT3 Throttle Body, SOFTRONIC ECU TUNE, 390 hp 310 lbs tq

***Upgrades in 2011.
Since I turned 40 this year it was a great time and excuse to do a few upgrades to the C4S. The 2011 Carrera GTS came out from Porsche and I absolutely love the new Sport Design front bumper and GT2 side skirts that are also on the Sport Classic and Speedster. I wanted to freshen the look of my C4S with new LED lights as well, which turned out to be quite the nightmare to research how to retro-fit, but not so bad executing in the end. (GT2 side skirt part numbers: Part numbers are 997-504-363-80-01C and 997-504-364-80-01C.)
For the LED upgrade we just had to modify the wiring harness that runs to the front turn signals and fog lights. I have a great indy mechanic and he was able to splice the 2011 LED light mini cable looms into my existing main cable that runs to the turn signals and fog lights. The new LED lights use a single plug in for power versus three for the old units. I will include some short notes for wiring below, near bottom of this page. The parts for the bumper I purchased from Sunset Porsche in Oregon 800-346-0182. conversion parts consisted of :
-Sport design bumper (997-505-961-02) ---Lower lip spoiler "GTS" (997-505-983-05) OR what I now have "Sport Classic Lip" (997-505-983-06-G2L) ---Middle air deflector for "center mouth opening"(997-575-141-07 no center radiator) (with radiator 997-505-541-03 + retaining bracket 997-504-487-00)---Left and Right updated radiator shrouds (997-575-321-06-01c + 997-575-322-06-01c) ---Left and Right updated Led turn signal lights(997-631-083-01+ 997-631-084-01)---Left and Right updated headlight washer nozzles(2 quantity= 997-628-163-01)---Left and Right Grills (997-505-985-02-041 + 997-505-986-02-041)---2 mini cable looms to run to led turn signals (2 quantity 997-612-501-25)
Thicker Sport Steering Wheel, Interior Light weight Sport seats, Carbon Fiber package with stick shift knob, dash trim, brake lever, door insert, ignition surround, light switch surround, center console front extension and rear bin. Seal Gray Metallic Painted center console
**July 2010
Being some one who always looks for that little extra in the Power department. I have added the K&N Cold Air Intake system part # 57-7000 and the IPD intake Plenum. These 2 intake modifications combined have been an awesome improvement in mid range punch and high end pull. Originally there was an obvious flat spot in power between 4500-5500 rpm and then another sudden boost of power as intake manifold valves open and cams kick in. This is a common characteristic of the watercooled Porsche engines. Now with the added modificaton the power pulls noticeably stronger right through the old flat spot. Based on dyno figures I gained approximately 30 hp and 25 lbs tq between 4500-5500 rpm, where the old power band flat spot used to be, and now with about a 25 hp increase at the top end. Engine is making approximately 380 hp and 310 lbs of tq. I highly recommend these modifications and they are easy bolt ons. The Sound alone from the K&N intake is AWESOME! Gives if a GT3 shrieking sound from 5000-7200 rpm!
**April 2010.
I have owned the car a few weeks now and I finally got a chance to drive the C4S on my favorite Canyon roads. At first I drove a bit timid, but eventually very aggressive as my confidence rose. Conditions were epic, not a cloud in the sky and barely saw another car all morning. I was grinning ear to ear. The 911 is in a class all by itself. The Boxster is amazing and mid-engine neutral, makes you feel like a hero right away and does exactly what you expect. Where as the 911 is absolutely thrilling and even a bit more exciting at times because of the rear engine weight bias. You have to think a step ahead in the 911. Front end can get a little light and tends to push for a split second on aggressive turns, but once it bites the traction is amazing. I was just smiling and laughing the whole time because I was just so impressed and excited to be driving such an awesome machine.
See video of upgraded front bumper and nice drive by on youtube:
0-100 mph
http://www.youtube.com/watch?v=gtPqeuxwyaM&feature=youtu.be
Need to update videos with Getty Design Sport Classic Ducktail, but here are some old version vids.
Drive by with old version of ducktail spoiler. Misha design 2 Ducktail.:
Sport Classic Bumper, Sport Classic Chin Spoiler, GT2 side skirts, Dectane Rear Tail lights, and Misha Ducktail Ver 2.0 with more curve angle and steeper rake on tail
https://www.youtube.com/watch?v=qNN8yCVBOzY
Older drive by with original rear deck lid, but Sport classic/GTS Chin spoiler front end
http://www.youtube.com/watch?v=lV_OXTbYHaw
http://www.youtube.com/watch?v=veWTnBa9a7A
Carrera 4S featured in music videos for Sasha Piertese's "R.P.M" with Misha Ducktail v1
https://www.youtube.com/watch?v=Ggy_N6iTywU
https://www.youtube.com/watch?v=flxfWip22oU
*****************************************************
Wiring Instructions for 997.1 to 997.2 front turn, parking, fog light conversion
Porsche 997.1 front turn/park/fog light Wiring conversion to 997.2 bumper with LED lights.
LED Wiring Diagram/Instructions. I will try to describe the process for splicing in the new cable wires for the 997.2 front led setup.
The existing 997.1 front turn,parking,fog light = “tpf” wires and connectors run along a main cable in the front bumper. This main cable plugs in behind the passenger headlight. Tricky to unplug first time, but once you understand how the locking mechanism works it's easier. After removing front bumper unplug the main cable and remove from bumper attachment anchors.
There are 4 mini cables that branch off the main cable and run to the 2 side markers and 2 for each front tpf light.
The 997.1 tpf light has 3 connectors that plug into it. 1 plug for turn, 1 plug for parking, and 1 plug for fog light. Each plug has a ground wire as well. Make a note while inspecting connectors about which wires go to which function and mark with tape and compare this with notes in splicing instructions/descriptions.
The 997.2 LED combines all these functions into 1 single plug/connector cable loom. The voltage resistors are all built into the led light so there should not be any warning lights once spliced correctly. You will splice the 997.2 cable loom on to the original 3 connector wire set up. I suggest you plug the correct side of the 997.2 cable connectors into the 997.2 led light as a reference of which end to cut and splice. Work on cutting/splicing one function at a time if you get confused. (one thing I did, which I wish I did not, was completely cut the original connectors/plugs completely off. If your creative you can just splice into existing wires without completely cutting them off. This is only needed IF, BIG IF you ever decided you wanted to go back to your original bumper/ tpf light set up.. I never do, but you never know.
2 quantity - 997.2 mini LED cable looms will need to be ordered and spliced into existing main cable. The 997.2 mini cable loom wires are as follows:
-Yellow = Fog
-Orange/White = Parking
-Black = Turn signals
-Brown = Ground (note, only 1 ground wire vs 3 on 997.1)
-Gray = Side Marker, but will not be needed. Leave to side in case
NOTE: Brown = Ground. The original 997.1 will have 3 Brown wires that need to be separated from each function. These 3 Brown Ground wires will all be connected to the Single Brown wire on the new 997.2 mini cable loom.
****DRIVERS SIDE 997.1 cable wires to turn signals:
-Fog Light = Black/White stripe (Splice to Yellow wire on 997.2 cable loom) + brown to single brown on 997.2
-Parking = Orange/White stripe (Splice to Orange/White wire on 997.2 cable loom) + brown to single brown 997.2
-Turn = White/Black stripe (Splice to Black wire 997.2 cable loom) brown to single brown 997.2
****PASSENGER SIDE 997.1 cable loom to turn signals:
-Fog = White/Yellow stripe (Splice to Yellow wire on 997.2 cable loom) + brown to single brown on 997.2.
-Parking = Gray/Red stripe (Splice to Orange/White wire on 997.2 cable loom) + brown to single brown 997.2
-Turn = Black/Green stripe (Splice to Black wire 997.2 cable loom) brown to single brown 997.2.
Double check work and don't cut too many wires without thoroughly planning out how/where they be spliced.
Before attaching bumper, test lights. Plug main cable back in.
The only major difference with this set up and the 997.2 cars is that the LED thin daytime running light only comes on when you activate your parking lights. Then if you want a really bright daytime running light setup up you will have to manually pull on the light switch to activate your fog lights to run as well. It has just become habit for me to turn on my fog lights every time I get in the car.
Now, you can program your daytime running lights to come on if you have the Navigation/PCM system. Go into “Main” screen setup and activate the Daytime running light check box... BUT your headlights will be turned on as well.
Personally I love the upgrade and the small hassle of turning on my fog lights during the day does not bother me. I hope these instructions help. I wrote them up from memory and a small diagram a friend wrote up for me.. so PLEASE double check your work and have a clear understanding of how the wires are setup.
Enjoy!